
So, you want to get the geolocation (latitude and longitude) of the address that you input, how can you do that?
In Salesforce, you can get the geocode to be automatically calculated simply by enabling the default Geocode Data Integration Rules for your standard objects, such as Lead, Contact, and Account.
You can simply navigate to Setup > Data > Data Integration Rules and enable these features.

You might not be able to find it directly on the record detail page, but you can always use SOQL to query these fields (ex: BillingLatitude, BillingLongitude) like this:

How can we get the geocode for our custom objects?
Well, Salesforce does not provide such feature for custom objects unfortunately. However, we can make use of this default data integration rules on our custom objects. Without further ado, let's get into it!
1. Create custom fields for your custom object
I have created two fields on the custom object, one of which is a checkbox field to identify whether the record should manually update geocode and another field is the geolocation field.
checkboxfield to determine if manually update geocode is needed:

geolocationfield to store the latitude and longitude:

2. Enable Data Integration Rule and unset 'Bypass workflow rules'
I am using Contact as the dummy object for auto-generating geocode field on custom object. Of course, you can also use Account or Lead for this purpose.
Click on the Data Integration Rule 'Geocodes for Contact Mailing Address' and set it to be Activated.

Also, make sure you have unchecked 'Bypass workflow rules' by clicking Rule Settings button. If not, the update on Contact's geolocation by Data.com will not trigger the workflow that updates the geolocation on custom object.

3. Create a temporary Contact in Process Builder
We can create a process for the custom object and define the condition to trigger the action. My condition basically detects the change of the address fields or the checkbox to update geocode field.

Next, we need to set up the action to create a temporary Contact with the address information populated.

You might be wondering why I am also setting the Contact's LastName, FirstName, Mobile, WeChat_ID__c as the Id of the custom object. Well, the reason is that there's way too many duplication rules set up to check against other Contact records in the organization. This is also one way to identify that it is the temporary Contact that needs to be deleted after passing its geolocation information to our desired custom object.
4. Update custom object's geolocation and delete Contact using Flow
We can create an Autolaunched Flow to update the custom object's geolocation and then delete the Contact record. It is that simple and straightforward.

We can create variables for contactId, recordId, latitude, and longitude which we will be passing them into the Flow from Process Builder.
Please make sure you have set 'Available for input' for each variables, otherwise those fields will not be exposed to Process Builder.

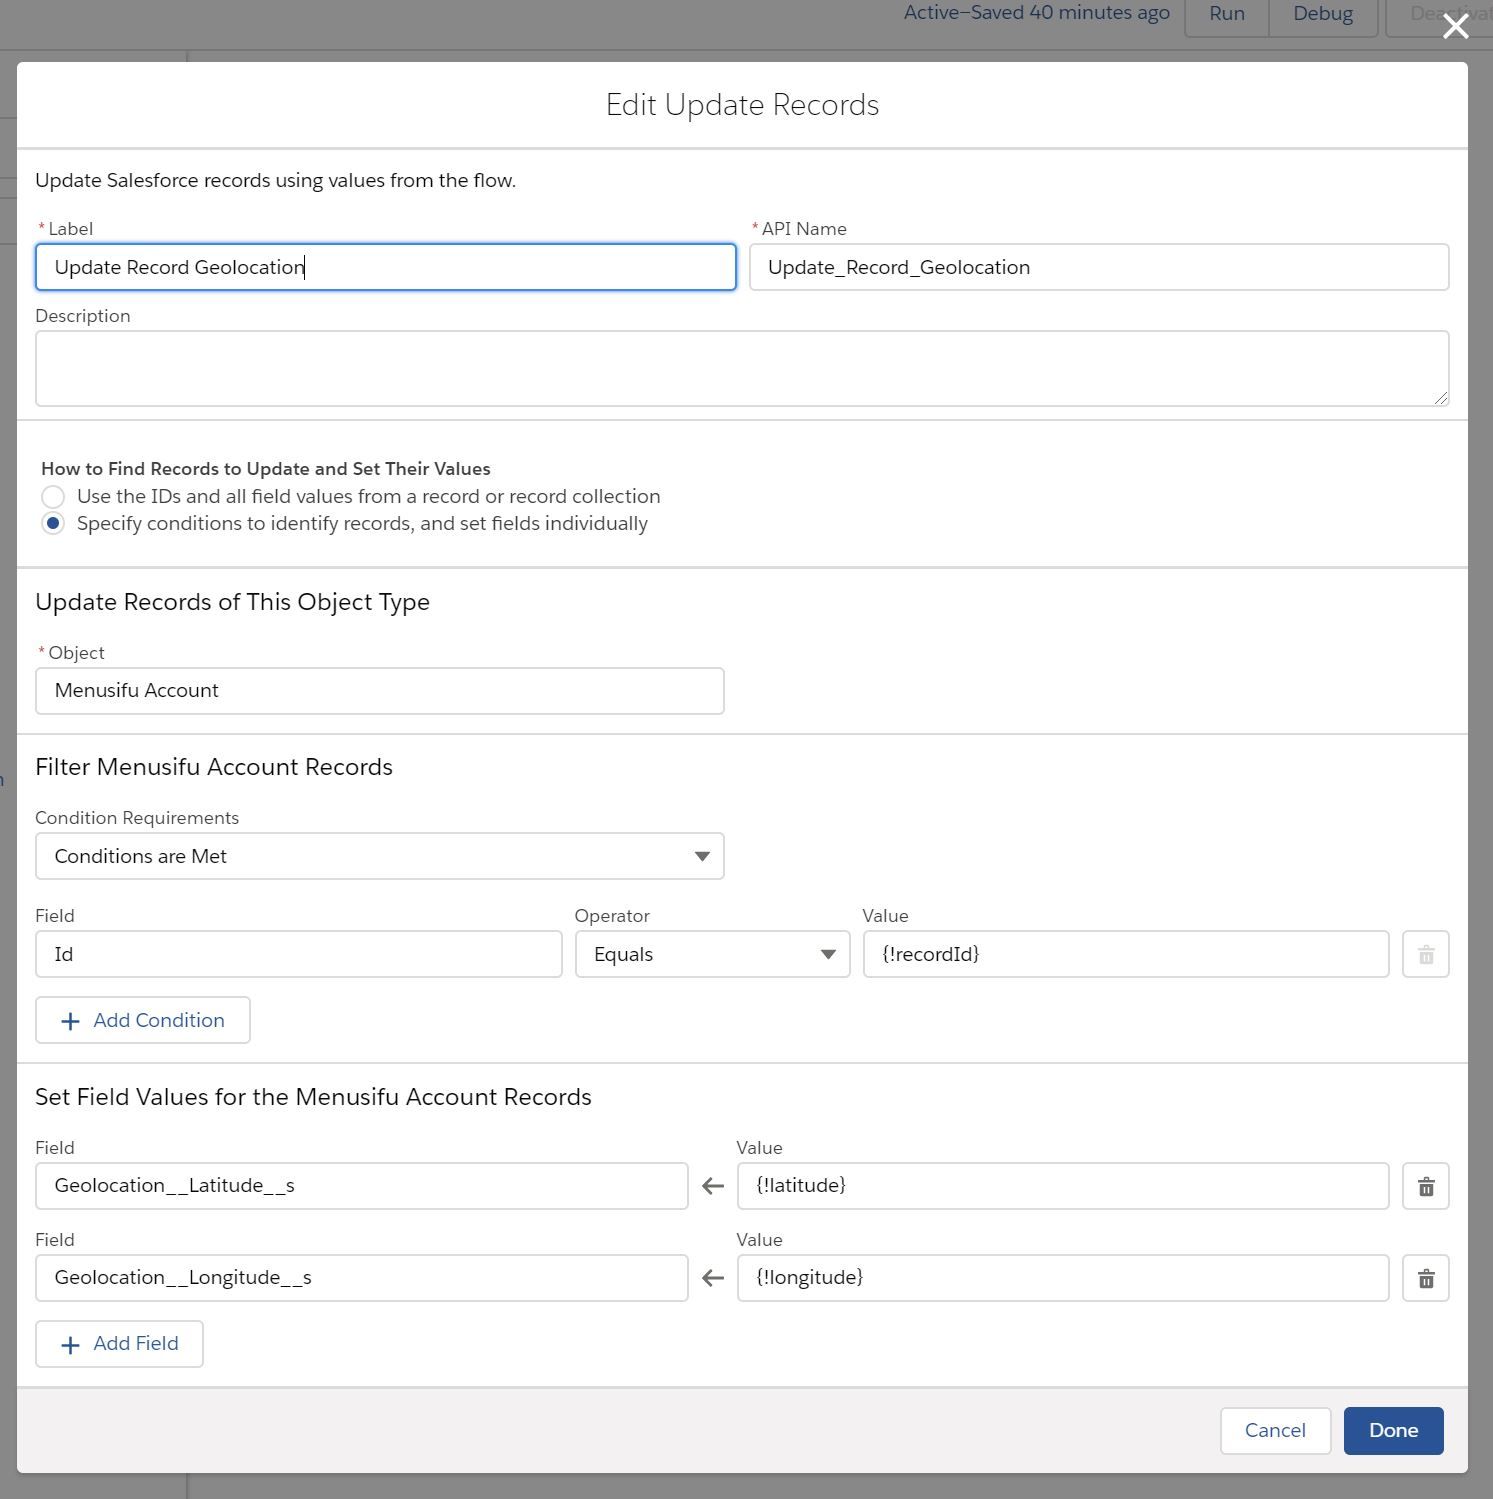
Then, we create a Update Record element to update the geolocation:
Lastly, we create a Delete Record element to delete the temp Contact:

5. Call the Flow in Process Builder
This is the last part of the tutorial. We create a process for Contact object and define the condition. By identifying both the MailingLatitude and MailingLongitude are not null and that the LastName is equals to FirstName that is equals to MobilePhone that is equals to WeChat_ID__c, we can safely call the Flow to update the geolocation and delete the Contact record.

Pass in the variables via records' reference fields.

Once you have done all that, you will be able to see it working properly!

Well, that's all about it! Hope you enjoy reading this tutorial!
Post was published on , last updated on .
Like the content? Support the author by paypal.me!